Welcome to Flat Kit

If you’ve got a question regarding Flat Kit, please read through the Frequently Asked Questions, and try searching for the answers here in this documentation. Also, many questions have been already covered in the issues page. If the question is not covered, please report an issue, go to our Discord or shoot an email to info@dustyroom.com.
If you find a bug, it really helps us if you include steps to reproduce it. Please mind that we get lots of messages daily, be patient - we’re getting to it. Also, if you’ve got a feature you’d like to see implemented, let us know — some of the great ones came from the suggestions. Flat Kit is a vast field of stylistic possibilities, so please make sure you skim trough this manual, it may help you understand all the features better and give you a few ideas.
Quick Overview
Flat Kit has everything you need to achieve a slick minimalist look in your project. We’ve spent hundreds of hours to research, design and implement the right set of assets needed to allow lots of customisation without sacrificing performance. We hope it works for your project out of the box, but if you have questions after reading this guide, let us know at info@dustyroom.com.
To name Flat Kit a set of flat shaders, cel shaders or toon ones, would be a serious underestimation. Yes, these all can be easily done. As well as countless other (maybe unseen before) styles. It can be sharp flat, it can have one, two, nine steps of hard shadow, or soft-shaded, or gradient-shaded — with pale or acid colors, it can have three gradient effects (when you start thinking out of the box, the parameter like ‘Specular’, a usual for, well, specularity or a glare, here can act as your fourth shadow, or a gradient etc).
At the moment, there are the following shaders included into Flat Kit: Stylized Surface, Stylized Surface Cutout, Stylized Surface with Outline, Gradient Skybox, Water, Terrain, Light Plane.
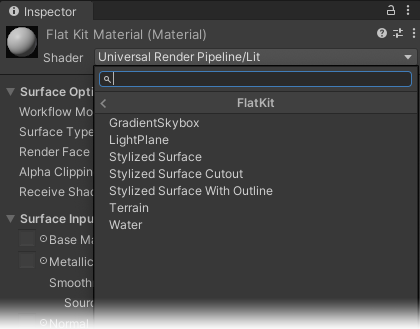
Collection of shaders in Flat Kit. From a Shader drop-down, hover the FlatKit sub-menu and choose a shader.
In case you already use any other flat-looking shaders, you will still find a variety of useful tools for quick image processing. Particularly, later in the manual we’ll overview the Height Gradient mode of the Stylized Surface shader, the Outline Image Effect, the Fog Image Effect, Water shader etc. They have quite little in relation to toon or cell shading, but in conjunction with a stylish flat or cel look, they add a whole new life to your scene. Plus, they can be used out of context of non-photorealistic aesthetics. It is a spice that can dramatically make your dish sweeter (tastier).
Flat Kit was made with optimised and fast workflow in mind, so that one could fulfil the picture popped up in the mind — as quickly as possible, in various ways. This means:
- One task could be done in different ways. It is a multi-purpose set of shaders;
- Some outstanding graphical results can be achieved in minutes (given that you have your models ready, there are lots in Flat Kit);
- There is always an element of you-didn’t-think-it-can-be-done-this-way surprise thanks to Flat Kit deep yet streamlined interface.
For example, let’s take fog, which is usually a big part of any 3D environment. There are lots of methods to implement fog into the scene, often complex and complicated. With Flat Kit, we decided to make it as convenient as possible for the user end. So, the fog can be done in two ways: using Fog Image Effect image effect or/and using LightPlane shader (see Wanderer demo scene).
We are going to explain how these work and what they are in this manual. Both ways suit different needs, but they really do compliment each other.
Another example of the multi-purpose nature of our shaders is cel shading itself. It would take a whole chapter of this manual to elaborate on cel shading. For now, it’s only worth mentioning that the same or similar results can be made using different parameters of the shader’s interface. It’s important, because apart from the expected ‘Cel Shade parameter’, Flat Kit also has a bunch of additional settings to explore. Each additional parameter of the shader adds an extra dimension of possibilities. All the tools designed for cel shading can do bread and butter stuff, as well as add lots of juice. But what’s important is that when these cel shading tools are combined, they are much more than the sum of the components — they synergise. We’ll talk about the importance of such a potential later in the manual.
One of the big advantages of using these shaders is the fact that you don’t have to guess how the colors will look on your scene. If you want precision and accuracy — you have it. Moreover, if you want something unpredictable and you are trying to make your scene look different to spark your inspiration and imagination, but not sure how, you can do this, too! Sometimes you’ll find yourself saving lots of temporary ‘cool stuff’ in ‘later’ folder while working on something specific, because pleasant surprises will keep popping. Remember, this is a set of shaders selected to complement each other.
That’s why we’ve made a demo scene for each shader and effect. It’s a good way to see how the shader works and how it can be used. You can find them in the Demo Scenes section.
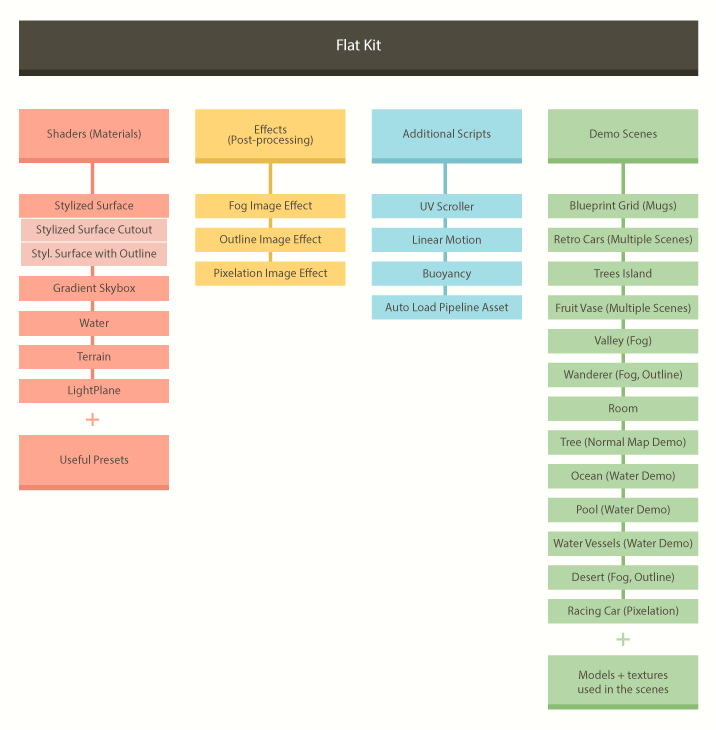
Flat Kit structural view chart
Comments