Flat Kit in URP
Although many of the features in Flat Kit look identically in URP and in Built-In RP versions, the differences are becoming inevitable for a couple of reasons. Built-in RP is being deprecated by Unity, URP is faster and it is a way to go, URP offers the tools Built-In RP is lacking. One of the differences is in post-processing. Flat Kit Built-In RP uses Post-Processing Stack v.2. Flat Kit URP provides post effects on the Renderers. Both of these offer similar post-processing tools but they behave differently. Even when using the same values for Color grading section in Built-In RP and URP, the outcome is slightly different.
Please note, Flat Kit had been initially created for the Built-in Rendering Pipeline. To keep the visual results as close to the original as possible, the URP version of Flat Kit is using HLSL code rather than shader graph. It means you can switch a Flat Kit project between URP and Built-in RP at any point without extra work. However if you’d like to edit the shaders, you’ll need some programming skills. Although you can switch between the Rendering Pipelines, we cannot guarantee that all Unity versions will let you do it flawlessly. That is why, to make Flat Kit work out of the box, we highly recommended that you created a Universal RP project to begin with.
URP Installation
In order to have a working Flat Kit in Universal RP (we’ve included the URP version alongside the Built-in pipeline version, in a single package), you’ll need to have Unity’s Universal RP package installed from the Package Manager (Window ▶︎ Package Manager) into your project.
After that, you will need to use a Universal RP Asset file, as this file lists the Renderers that, in their turn, list the Renderer Features (Image Effects). You can either use the one that comes with Flat Kit, called [Flat Kit] Example URP Asset, or you can create your own URP asset file to work with.
- Right click on Assets (in Project tab) ▶︎ Create ▶︎ Rendering ▶︎ URP ▶︎ Pipeline Asset.
Once you do it, the Asset file and a Renderer are created.
You can set the Asset file manualy or using the Flat Kit’s Auto Load Pipeline Asset script.
-
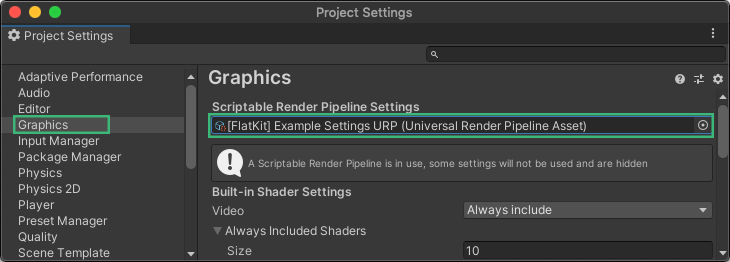
Manual Step 1. Navigate to Project Settings ▶︎ Graphics and insert [FlatKit] Example URP Asset file into Scriptable Rendering Pipeline Setting field. If you are using your settings file instead, please make sure to have Opaque texture and Depth texture checkboxes on, which can be found on Inspector tab when you select that URP settings file.
-
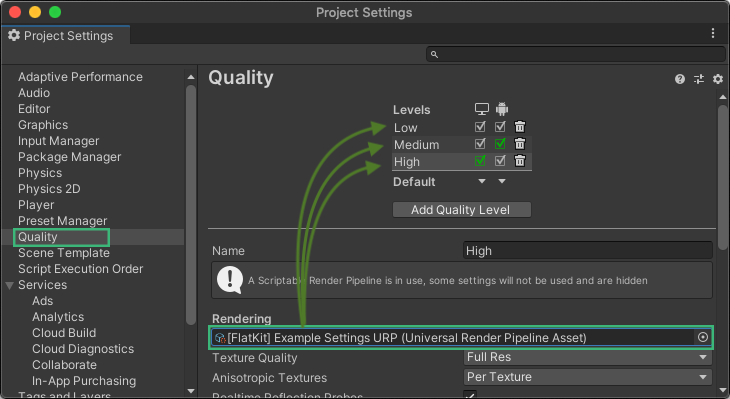
Manual Step 2. Please do this in Quality tab’s Rendering field as well. This Example Settings file comes with Flat Kit — select [FlatKit] Example URP Asset file. Do it for all Quality levels.
Flat Kit Image Effects in URP
The Fog, Outline and Pixellation effects are implemented as Renderer Features in URP. To use them, you need to add them to the Renderer that is assigned to your URP Asset file. You can either use the one that comes with Flat Kit, called [Flat Kit] Example Forward Renderer, or you can create your own Renderer file to work with.
Our Demo scenes already include their own URP Assets with Renderers (per scene). It is done via Auto Load Pipeline Asset script, which is included in the package. Please visit the script’s page for more details on how it works.
Comments