Outlines Effect

Outline Image effect is, essentially, a contour on the objects on the scene. It is a global effect, meaning that it is applied to the whole scene. It is not selective to objects. It is applied per Renderer (in URP) in screen space.
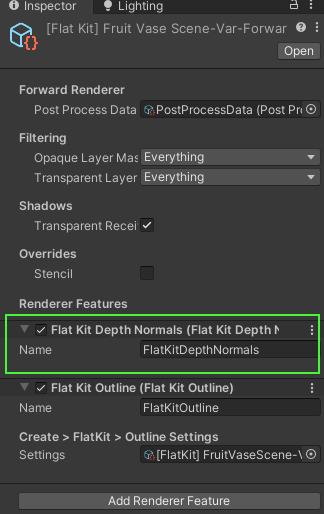
Outline Forward Renderer in URP. Inspector interface.
Both Fog and Outline image effects can use image-based anti-aliasing, like the one in Unity’s Post-processing stack.
- In Universal RP (URP): post-processing effects are called ‘Renderer Features’ of the Forward Renderer.
- In Built-In RP: Post-processing is made of Camera effects placed onto the camera in the scene as Components.
Although the Outline effect is global and not selective to the objects, still, here’s how to exclude objects from outlines.
TIP: Combinations of the settings in Outline Image Effect let you control the behavior of the outlines quite widely already. You can get even more control on the outlines using the Outline parameters of Stylized Surface shader in addition to the global Outline effect. Also, the Rim parameter of Stylized Surface and Outline parameters of Stylized Surface shader can accentuate object’s edges, often it looks like a partial outline, which can be helpful.
Setting up Flat Kit Outline (URP)
If you are working in a Universal Rendering Pipeline (URP) project, the post processing components you used to put on the camera in the old Built-In RP (‘Standard’, ‘3D’ project) — they are called ‘Renderer Features’ in URP and can be found in the settings of the Forward Renderer.
Please make sure that you installed Flat Kit properly as described here.
After that you’ll be able to load, for example, Wanderer demo scene that comes with Flat Kit, launch the scene (press Play) and see the outlines displayed.
To be able to use Flat Kit’s Outline in your own scene, you can either go from scratch:
- Create a new Forward Renderer. To avoid further confusion, name it, for example, MyNewAwesomeForwardRenderer. (Go to Assets menu on top ▶︎ Create ▶︎ Rendering Universal Rendering Pipeline ▶︎ Forward Renderer).
- Add it to the Renderer List of the [Flat Kit] Example URP Asset file in the Inspector panel. To do this, go to Project panel ▶︎ Flat Kit ▶︎ ExampleSettings ▶︎ [FlatKit] Example URP Asset. Select it, look at the Inspector panel, see the Renderer List section, press ’+’ button and drag MyNewAwesomeForwardRenderer Forward Renderer you created in step 1 — into the created line of the Renderer List.
- Select that newly created MyNewAwesomeForwardRenderer Forward Renderer, press ‘Add Renderer Feature’ and Select Flat Kit Outline. This will add the Outline Renderer feature. But to be able to adjust parameters, like width, color of the outlines, you’ll need to create the Outline Settings file.
- Go Assets menu on top ▶︎ Create ▶︎ FlatKit ▶︎ Outline Settings. This creates an Outline settings file. Name it MyNewOutlinesSettings.
- Add this ‘MyNewOutlinesSettings’ settings file to Flat Kit Outline Renderer Feature you created in step 3 — into the Settings field.
- In your scene select the camera (Main Camera) in Hierarchy panel, look at Inspector panel, find Rendering section and in the Renderer drop down menu select MyNewAwesomeForwardRenderer Forward Renderer you created in step 1.
- You may need to launch the scene by pressing Play.
Or, you can do it the easy way.
- In your scene select the camera (Main Camera) in Hierarchy panel, look at Inspector panel, find Rendering section and in the Renderer drop down menu select [FlatKit] Wanderer-ForwardRenderer or [FlatKit] FruitVaseScene-Var-ForwardRenderer. They both have outlines already engaged.
- You may need to press Play.
To change the parameters of the outlines then, please:
- Press Ctrl + F (Windows) or Cmd + F (macOS) and type [FlatKit] Wanderer-Var-OutlineSettings in the search field that becomes active in Project Panel. Select the found file and change the parameters in the Inspector panel.
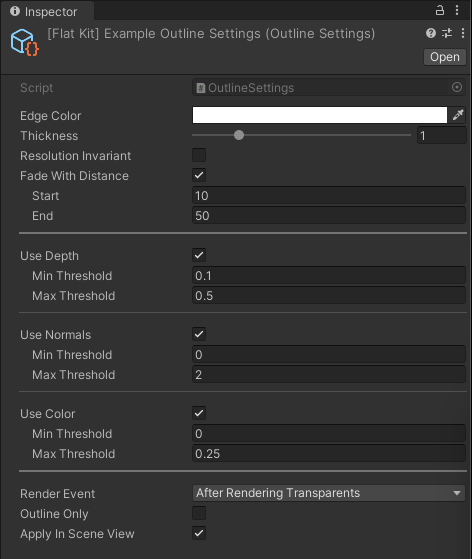
Parameters of Flat Kit Outline
Main Parameters
- Edge Color lets you choose the color of the outline.
- Thickness makes the outline thicker or thinner. It controls how wide or narrow the line of the outline is.
- Fade With Distance if enabled, the outline will become more transparent the further away it is from the camera. Once enabled, two additional parameters appear:
- Start controls the distance from the camera at which the outline starts to fade. The value is in world units.
- End controls the distance from the camera at which the outline is fully transparent. The value is in world units.
- Resolution Invariant if enabled, the line width will stay constant regardless of the rendering resolution. However, some of the lines may appear blurry.
- Use Depth enables or disables taking the scene’s depth data into calculating the outlines. This parameter outlines the outer contour of the objects with depth threshold control.
- Use Normals creates outlines based on the angle difference of the normals of a mesh. The effect mainly depends on the geometry of an object. So, having proper normals here is important, please see this paragraph describing in detail how to manipulate normals.

- Use Color enables or disables taking all color difference data on the scene when calculating the outlines. This feature is URP only.

NOTE: If you see that Use Depth and Use Normals have no effect in your project, please navigate to Project Settings ▶︎ Graphics and insert [FlatKit] Example URP Asset file into Scriptable Rendering Pipeline Setting field. If you are using your own settings file instead, please make sure to have Opaque texture and Depth texture checkboxes on, which can be found on Inspector tab when you select that URP settings file.
Advanced Parameters
This section hosts the parameters to adjust the tools above as well as a few more controls. The thresholds parameters are basically the limits that determine the ranges in which the effects take places. For example, the higher Min Depth value is, the further away from camera the outline will be generated. The lower Max Depth value is, the sooner outlines stop occurring.
- Min Depth Threshold and Max Depth Threshold determine the range of depth differences where outline should be applied. Lower values draw lines “inside” the scene resulting in a more beveled image. Higher values have more flat effect.
- Min Normals Threshold and Max Normals Threshold determine the range of normals edges to be outlined. Lower values increase the amount of affected normals, leading to more stroked effect. Higher values decrease the amount of affected normals, leading to flatter look. Basically, it determines min and max angles of the normals for the outlines to occur.
- Min and Max Color Thresholds let you set the least and the strongest differences in color of the mesh to make the outline appear. The higher the value, the more contrast is needed to make the outline appear. The lower the value, the less contrast is needed to make the outline appear.
- Render Event This is one quite powerful feature available on the interface. It lets you choose a stage at which the outlines are applied. It allows to apply outlines over the transparent objects. If you want to exclude transparent objects like Water or UI elements, set this to ‘Before Transparent’. Also, it allows you to stack the Outline Image Effect with other post effects. This feature is URP only.
- Outline Only If enabled, it will render only the outlines. This parameter is URP only.
- Apply In Scene View Whether the effect should be applied in the Scene view as well as in the Game view. Please, keep in mind that Unity always renders the scene with the default Renderer settings of the URP config.
In some cases you’ll need to press ‘Play’ to see the effect of Render Event.
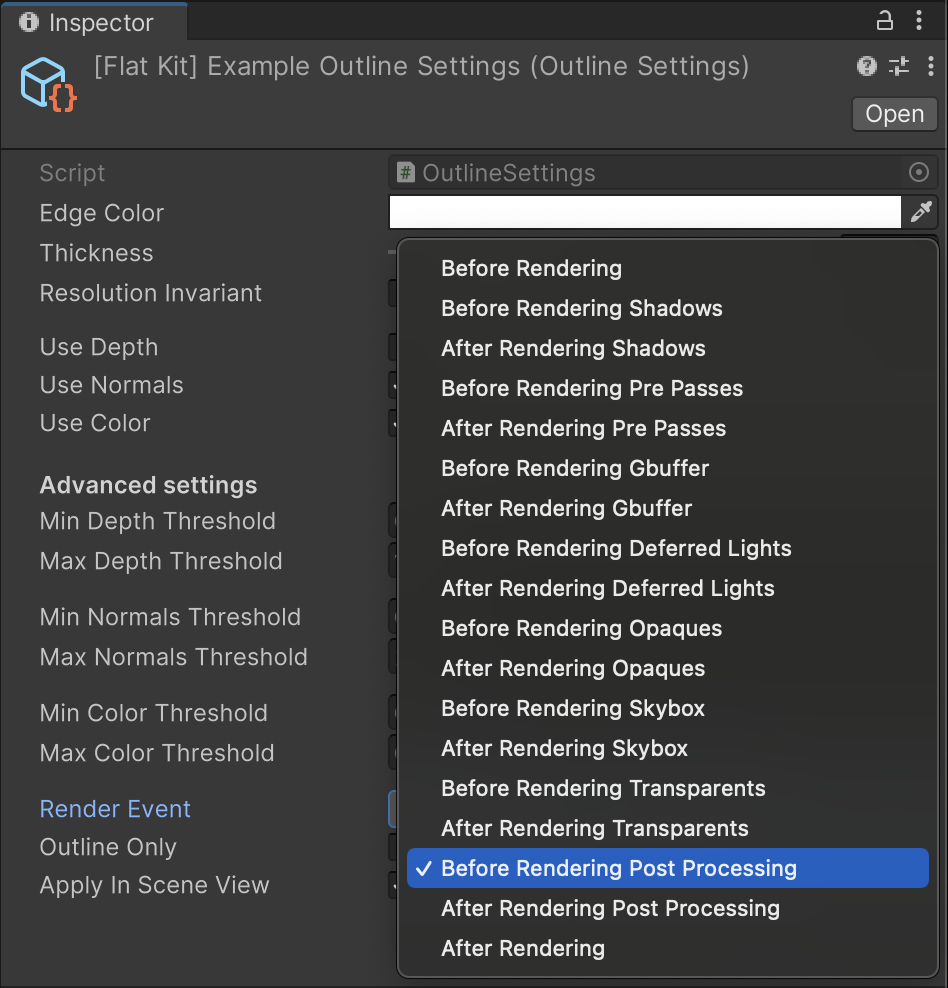
Outline Image Effect Render Event list
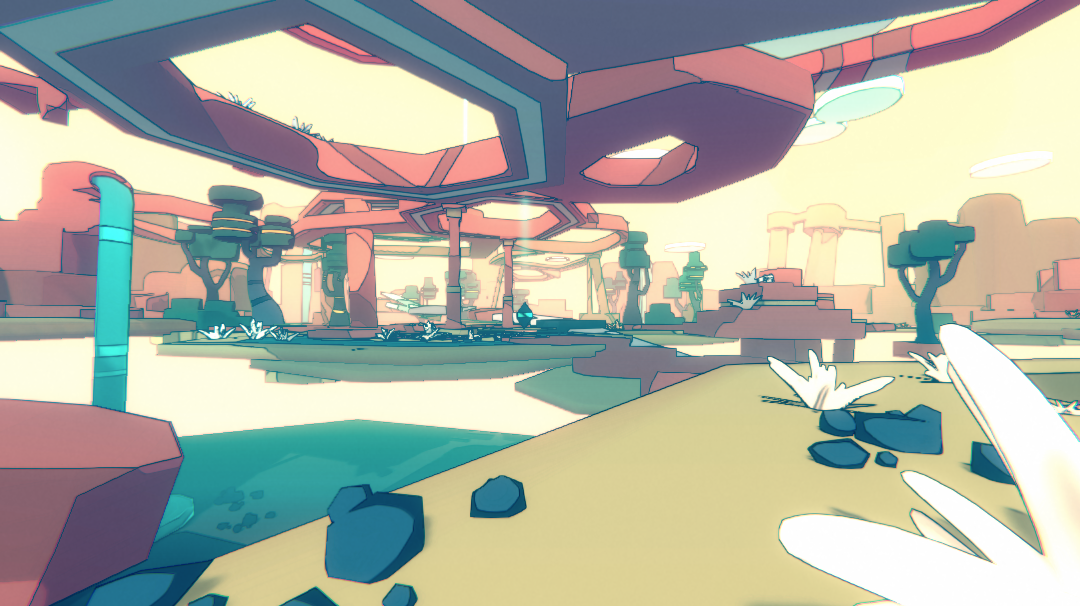
Here is an example of choosing when to render the outlines. We took Wanderer demo scene and applied an example Outline Image Effect. After that we tried a few different items from the Render Event list.
‘After Rendering Skybox’ chosen in Render Event list. Wanderer demo scene
‘Before Rendering Post Processing’ chosen in Render Event list, ‘Outlines Only’ parameter ticked
Also, in URP you have an ability to chain and change the orders of Image effects, but it’s a general Unity information. More info in the chapter Flat Kit Image Effects in URP
Please note that Outline Image Effect is a global effect. You can use Stylized Surface shader to outline a particular object. It is a parameter (shader pass) that is built on top of the Stylized Surface shader. It has all the features of the Stylized Surface shader plus the outline feature.
Flat Kit Depth Normals Renderer Feature
NOTE: The Flat Kit Depth Normals is no longer needed starting Unity 2021.1 and will soon be removed.
Manipulating the normals of the mesh
Manipulating the normals of the mesh can be a very efficient way to control the behavior of the outlines.
Normals are the vectors that are perpendicular to the surface of the mesh. But you can change this angle from 90° to any other angle. After doing it the visually parallel faces of the mesh will be treated as if they are not parallel anymore. This will make the outlines appear on the edges of the processed faces.
It can be done in a 3d editor. For example, here’s how to do it in Blender.
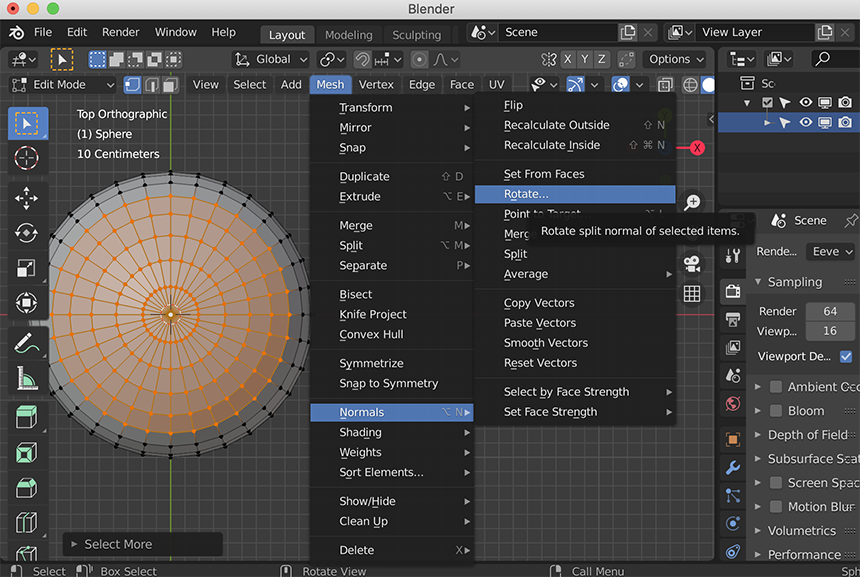
Rotating normals in Blender. Manipulating the normals angle is one of the ways to make Flat Kit generate outlines where you want them
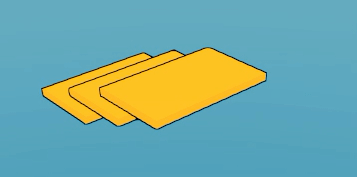
Here is an example of the abovementioned info on a few parallel primitives.
On the left side, all 4 shapes are identical simple meshes (copies), the normals are not adjusted. You can see that there are no outlines where the top faces merge visually.
On the right side, the three bottom meshes are identical to the left ones (copies), but the top mesh has a normal rotated in Blender — just enough to make the sufficient difference so that Min/Max Normals Threshold parameter detects an angle and generates an outline.
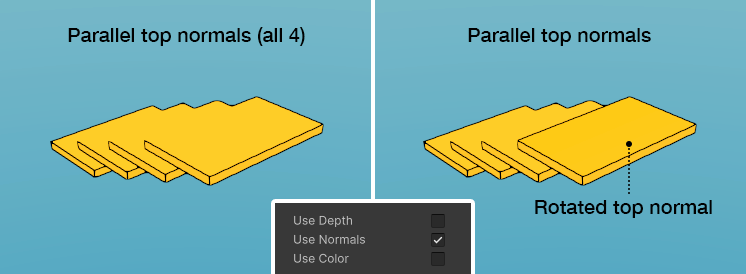
Two sets of identical meshes, with the difference of one mesh having a rotated normal
Alternatively, Unity has its own tools for doing some operations on the normals of the imported models. Once you select an imported object, go to the Inspector panel and switch to the Model tab. There you’ll find the Normals section. You can try adjusting the Normals Mode and Normals Import Settings parameters. The Smoothing Angle is particularly useful for controlling the amount of outlines if you use Min/Max Normals Threshold parameter in Flat Kit Outline settings. Please, keep in mind that this is a general Unity feature and is not related to Flat Kit.
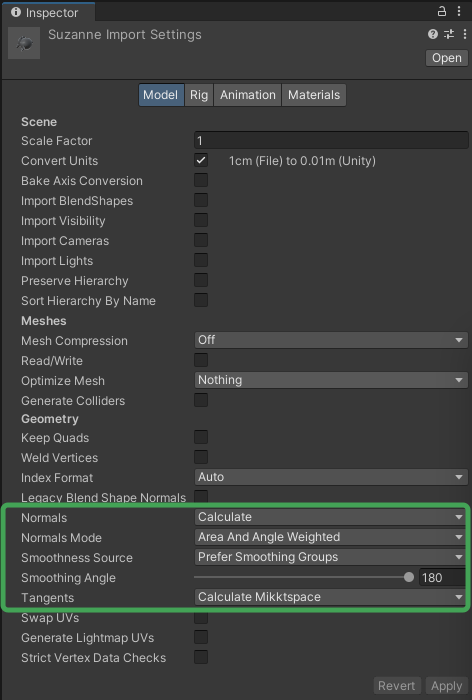
Parameters for adjusting the normals of the imported models in Unity
Excluding objects from outlines
One of the commonly asked questions is if some of the objects can be rendered without the Outline Renderer Feature applied. Outline image effect is global and is not designed to be selective to objects — it is applied per Renderer (in URP) in screen space.
However, there are some ways to exclude objects from outlines.
-
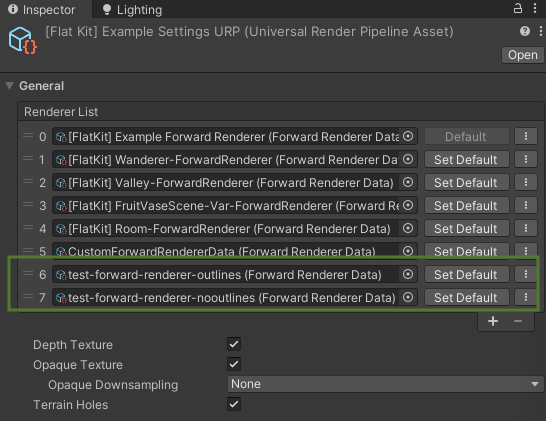
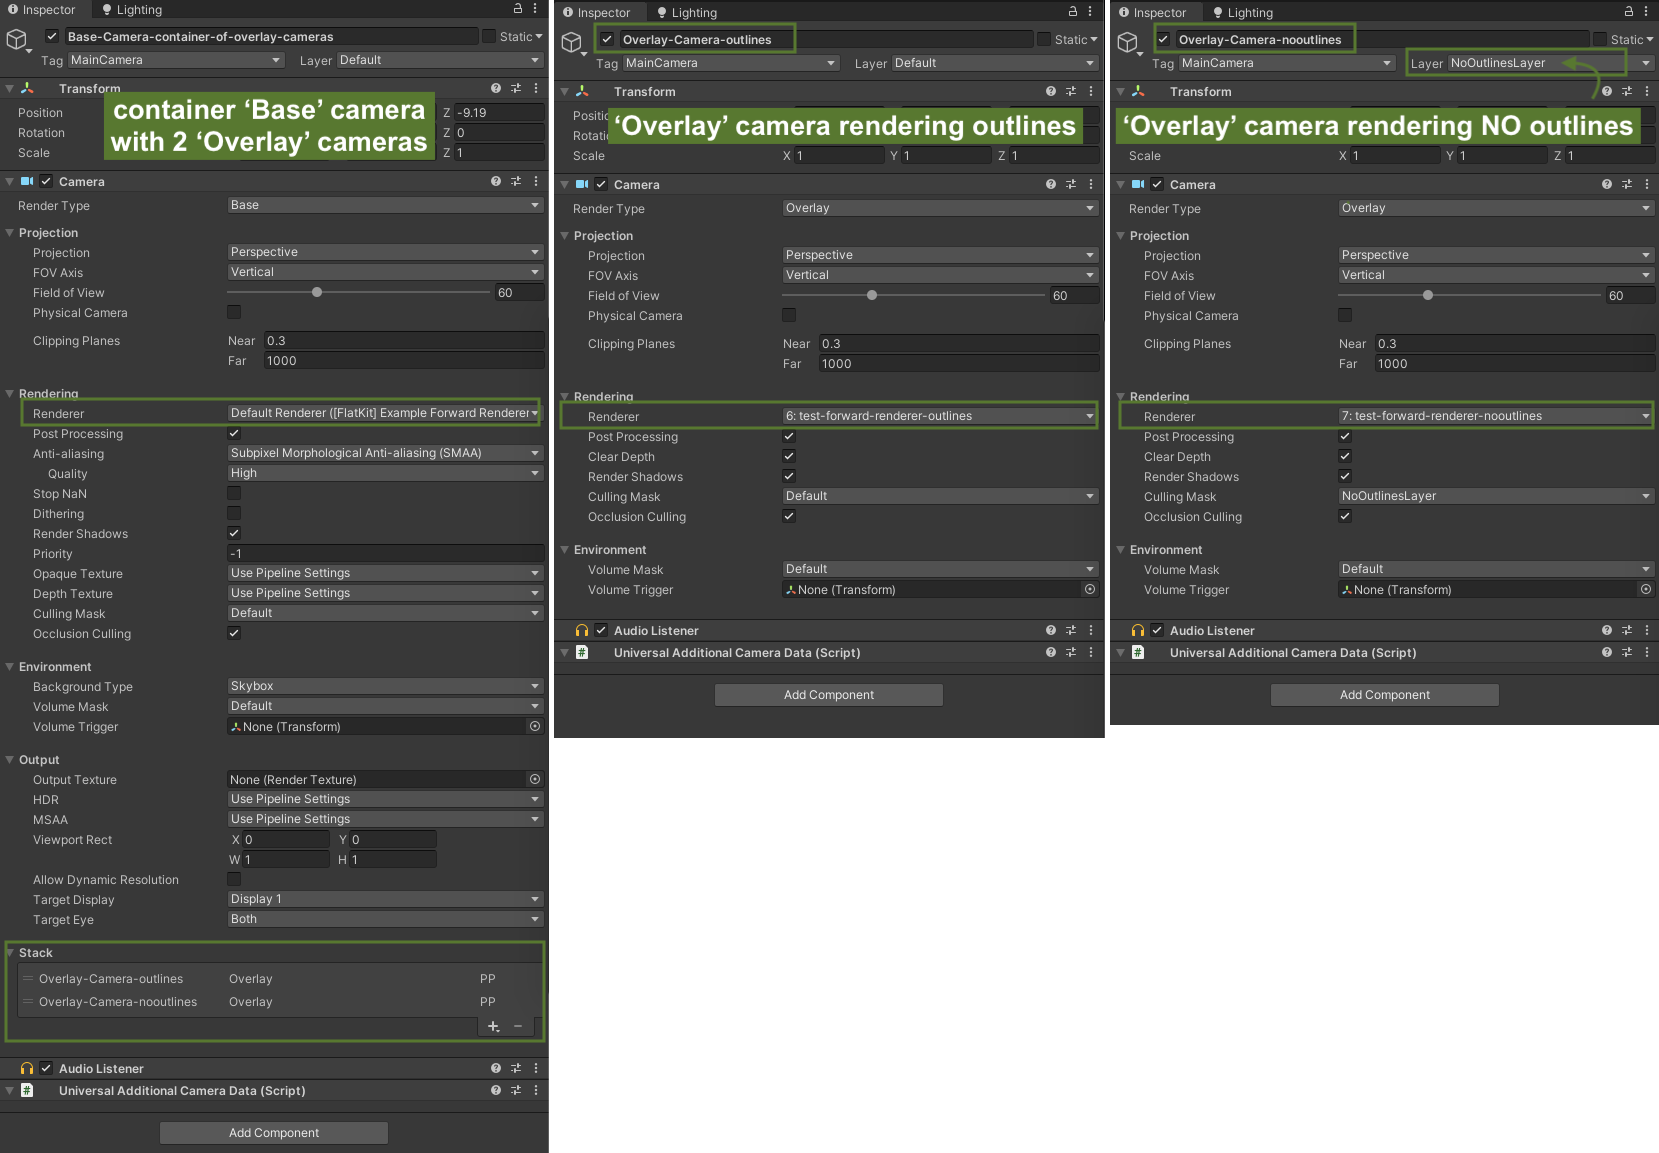
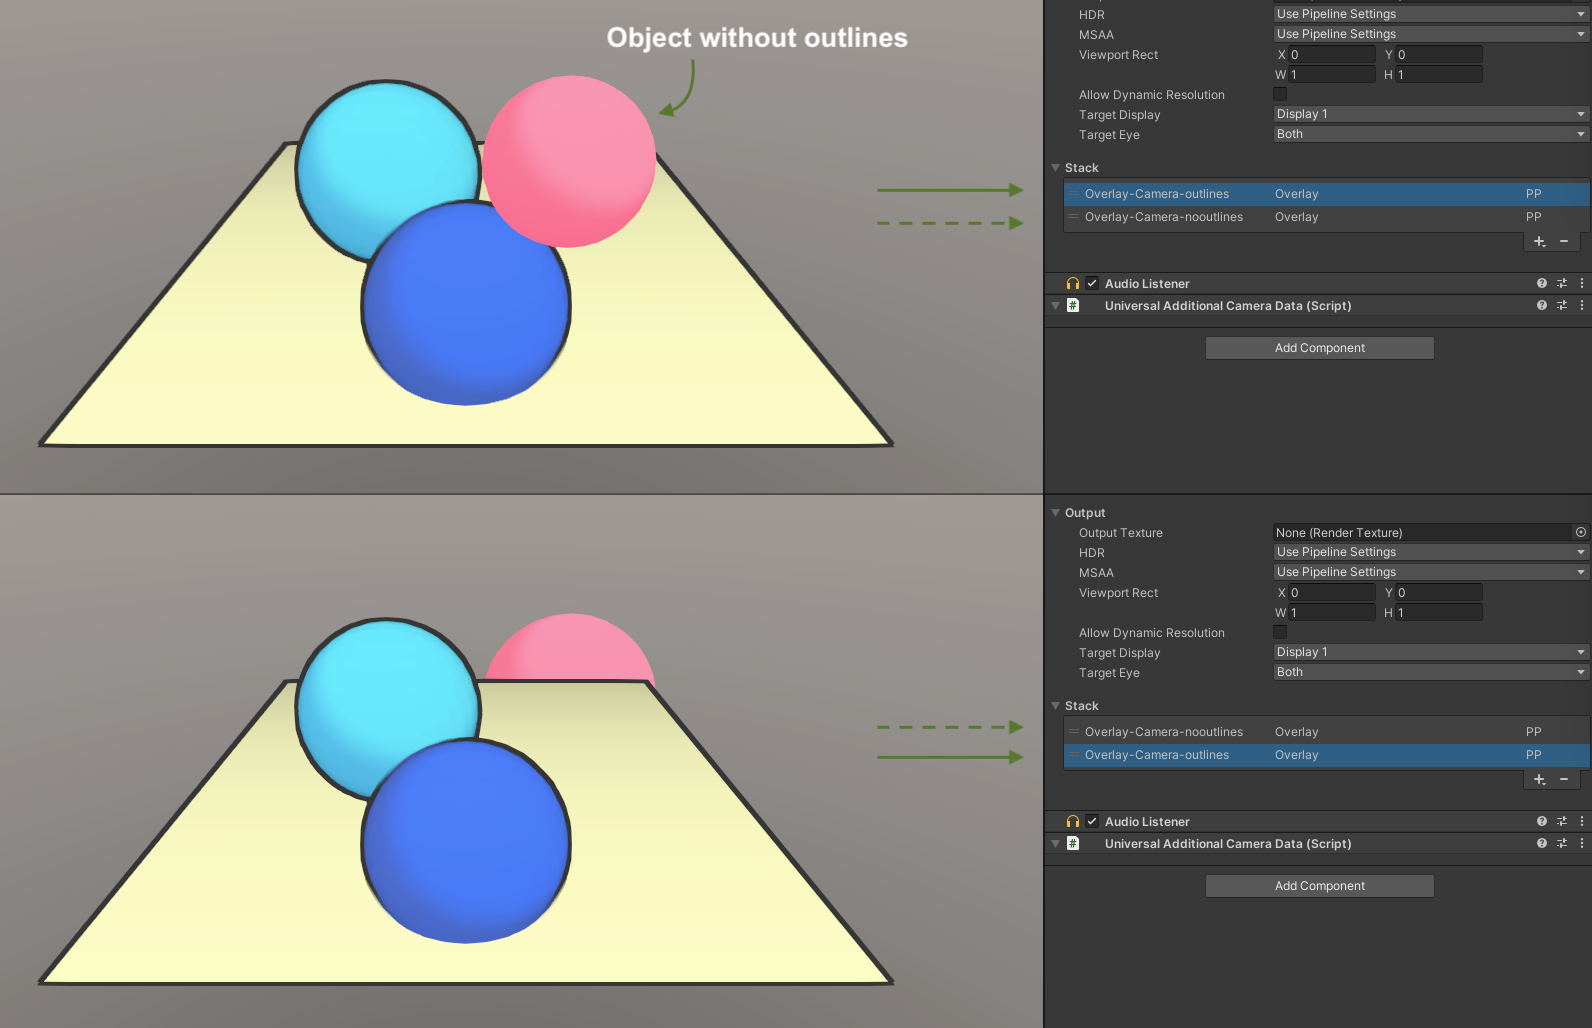
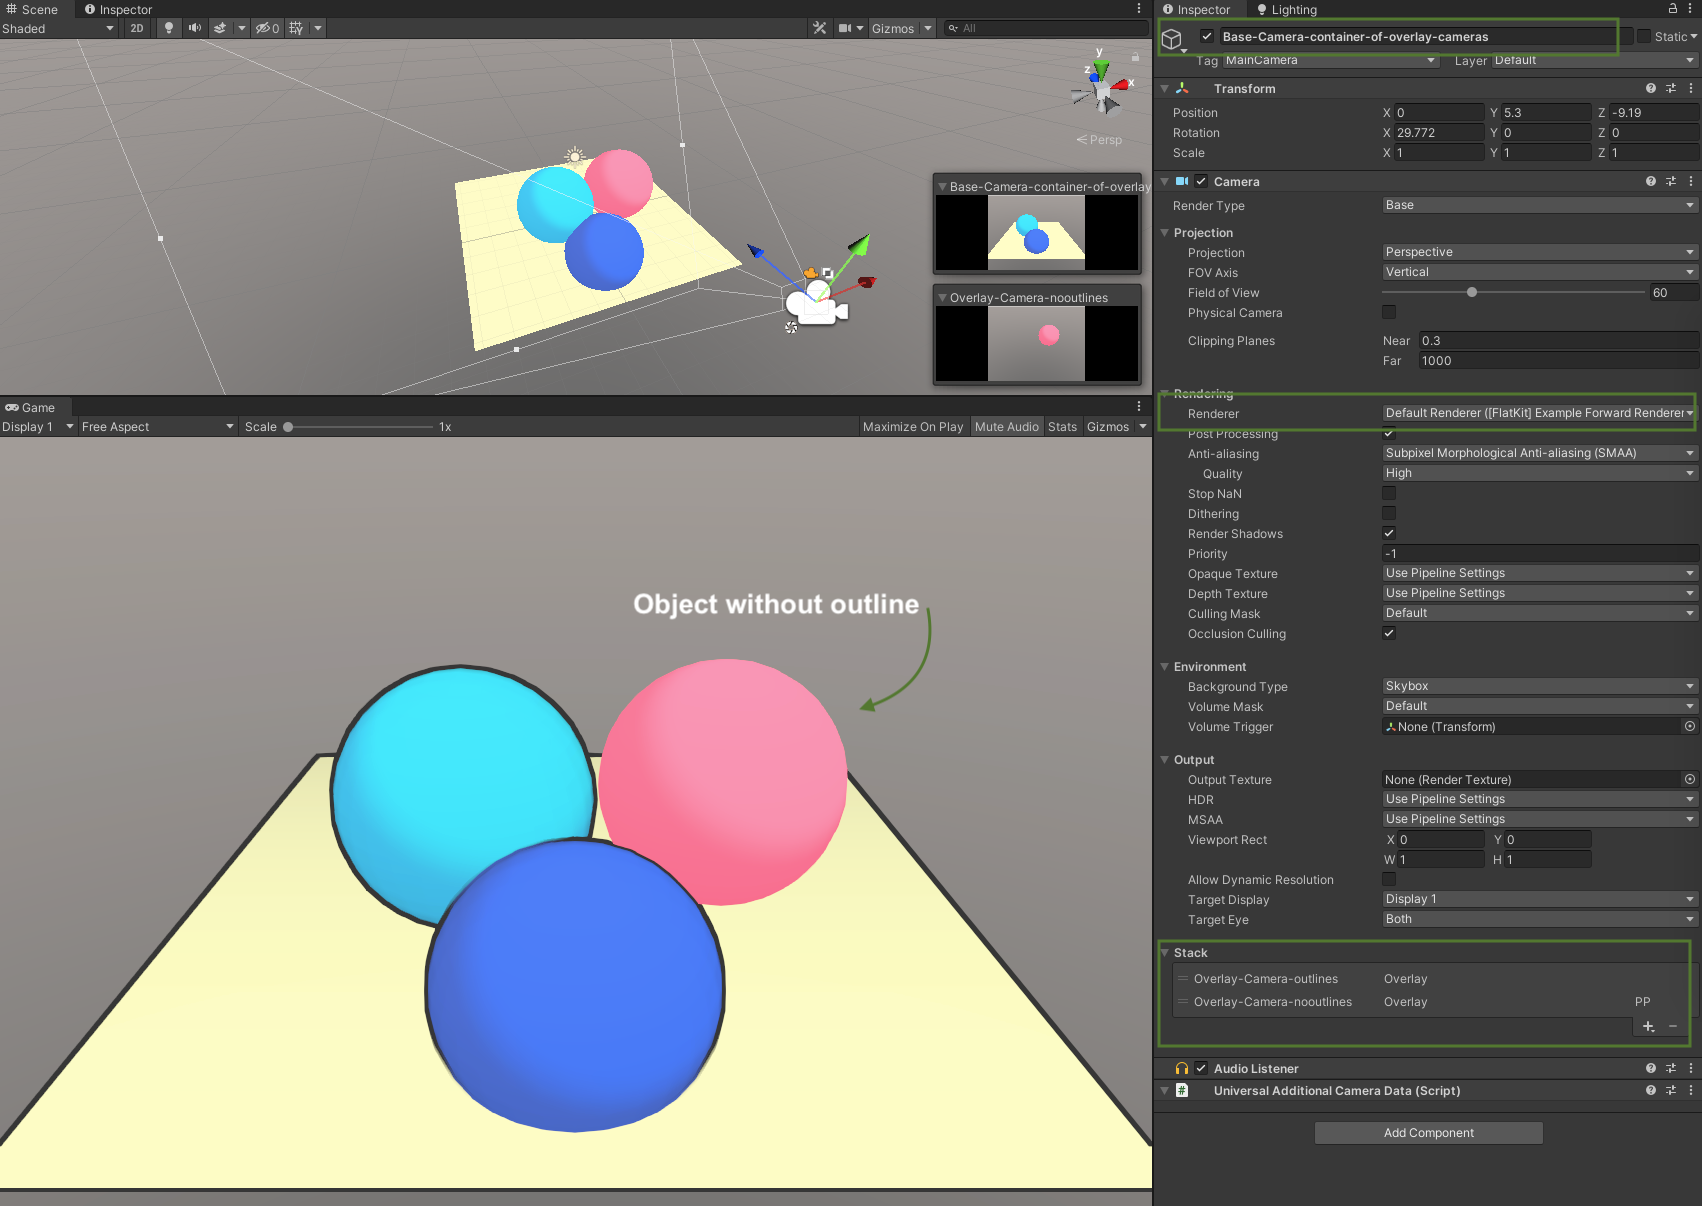
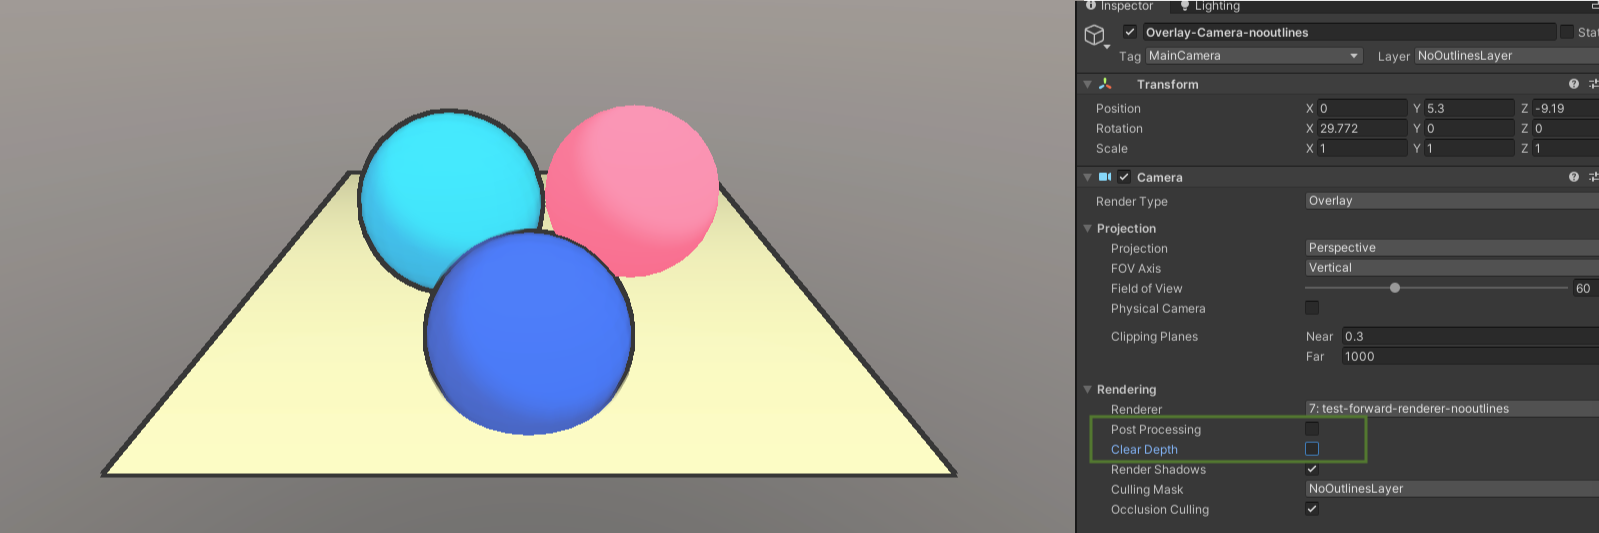
METHOD 1 One of the ways is to use two cameras in a camera stack: one camera is for non-outlined objects and another one is for everything else (outlined). Please refer to Unity documentation on camera stacking to get to know more about this general Unity technique better.
-
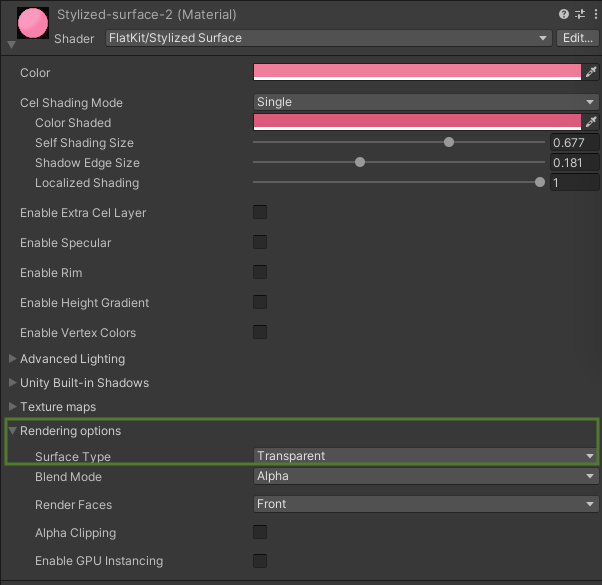
METHOD 2 Another way of excluding objects from rendered outlines is moving object to be rendered in the transparent pass. In Flat Kit’s Stylized Surface there is such an option (please see Rendering Options of the Stylized Surface shader).
If you are using non-Flat Kit shaders, please refer to their documentation to see whether it is possible — to enable the transparency pass.
Once you switch rendering to ‘Transparent’, it won’t change the look of the shader but will exclude it from the outline pass.
After that, you’ll need to go to the Flat Kit’s Outline image effects settings and locate the Render event parameter. It lets you choose at which stage to render the lines. In our case, it’s ‘Before Transparents’.-
Step 1. Turn on the transparency in the shader.
-
Step 2. On the Outline settings panel, Set the Render Event to Before Transparents.
-
Outlines on transparent objects
If you want to have outlines on transparent objects, you can set the Render Event to After Transparents or any other option that comes after the transparent pass. Sometimes you’ll need to press Play to see the effect of the Render Event changing.
NOTE: Transparent objects can be outlined only by the Color threshold parameter. This is a URP limitation: transparent objects are excluded from camera depth/normals textures in URP, so depth/normals outline modes won’t detect them. That’s why enabling Use Color works on transparent materials.
Comments