Installation
Flat Kit is fully self-contained and does not depend on any external assets.
If you do not need demo scenes, example materials and models you may skip importing the Demos directory in the asset.
The easiest way to get started with the asset is to dig into the demo scenes.
For Built-In RP it may take a while for Unity to import the asset — this is normal. Under the hood, Unity needs to generate all shader variants that are used in the demo scenes. For URP it is virtually immediate.
For URP, it is important that you created the project in URP initially, as opposed to creating a Built-in RP project and ‘upgrading’ it to URP one.
On the 3D models side, it’s important that you decide whether you would like making normals ‘smooth’ or ‘sharp’ for your meshes in a 3D editor, as the result will be different in either case. If you import someone else’s models and can’t edit the object in 3D editor, at least try to calculate normals in Unity — in the import settings of the model. The shaders should work regardless, but sometimes the difference can be obvious, especially on objects with rounded corners.
NOTE. Our demos were created in Linear color space (a setting found in Edit ▶︎ Project Settings). We recommend switching to it if your project is in Gamma color space, although this is entirely optional.
Here’s a video showing how to import a Universal RP (URP) version of Flat Kit in a Universal RP project.
Below are the written instructions on how to import Flat Kit. You can watch the video above of follow the guide below.
-
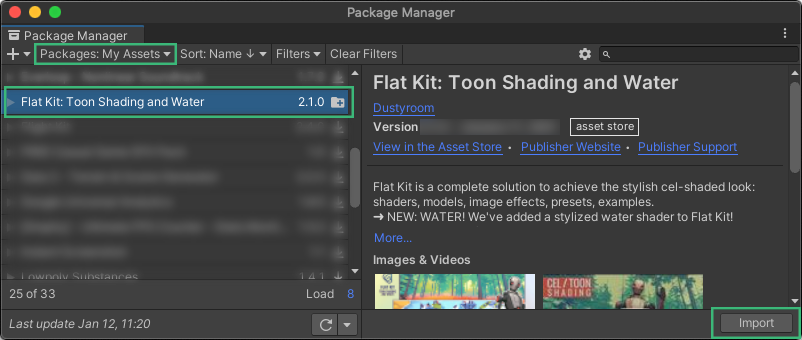
Step 1. It’s advised that you imported Flat Kit from Unity Package Manager. Please make sure you have Unity v. 2020.3 LTS or later running. Go to Window ▶︎ Package Manager. On the top left find the My Assets drop down menu. You’ll find Flat Kit among your assets. Choose the version you’d like to import. Click Download, then Import.
-
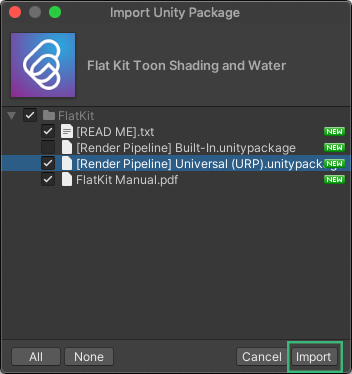
Step 2. Choose which version of Flat Kit to import. If your project is in URP - select [Render Pipeline] Universal (URP).unitypackage. If your project is in Built-In RP, choose [Render Pipeline] Built-In.unitypackage. Click Import. You can re-import any of the versions anytime. The latest imported version overwrites the previously installed one. If you don’t see this step, see the note below.
-
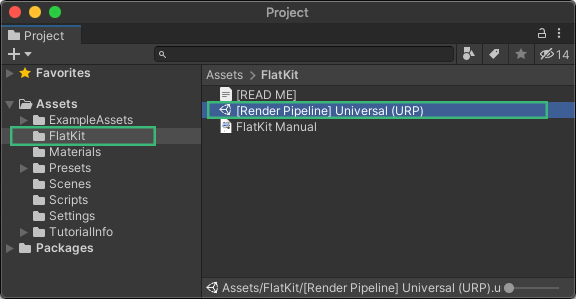
Step 3. Once imported, go to Project tab ▶︎ Assets ▶︎ Flat Kit. You’ll find the Flat Kit unitypackage file of your preferred RP. Double-click it.
-
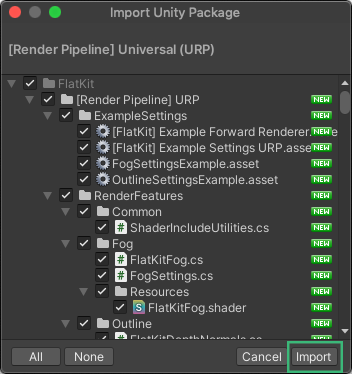
Step 4. Pick what contents of Flat Kit would you like to get unpacked. Click Import. You can import anything at any time while working on your project.
NOTE. If you don’t see step 2 while importing, or URP unitypackage is missing, try cleanig the Unity Package Manager cache and import / update Flat Kit after that. The cache files can be found here:
Mac OS: ~/Library/Unity/Asset Store-5.x (press Shift+Cmd+G in Finder and paste this path)
Windows: %APPDATA%\Unity\Asset Store-5.x (hidden folder)
Linux: ~/.local/share/unity3d/Asset Store-5.x
More info about the Unity cache can be found in the Unity community answers page here.
NOTE. If you are going to use the URP version of Flat Kit, it is highly advised that you created an originally URP project, NOT a URP project ‘upgraded’ from a Built-in RP one.
We included a Readme tool, which is a useful debugging helper. It does the following:
- Shows the stats like Unity, Universal RP and Flat Kit’s versions;
- Detects what RP the project belongs to (Universal RP or Built-In RP);
- Checks for available updates;
- Clears Flat Kit’s Package Manager cache, which can be useful in re-importing Flat Kit during troubleshooting;
- Opens this documentation as well as redirects to Git where you can open a support ticket;
- Copies debug info which is useful for in-depth troubleshooting.
The [Readme] file can be found in Project panel ▶︎ Assets folder ▶︎ Flat Kit folder ▶︎ [Readme].
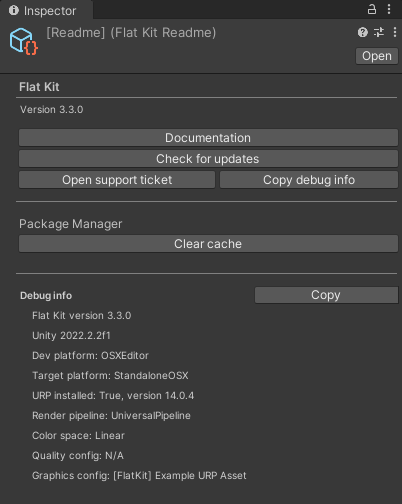
Readme tool’s interface
If you have any difficulties during the installation, or at any point while working with Flat Kit, please, contact us, we’ll be glad to help.
After importing, Flat Kit gives errors
- First, try restarting Unity. A simple restart indeed sometimes fixes some strange issues.
- Re-import Flat Kit the fast way. Here is how:
- In Unity, go to Project panel ▶︎ Assets folder ▶︎ Flat Kit folder;
- Right click on the Flat Kit folder and choose Reimport.
- Re-import Flat Kit the deeper way. Here is how:
- Please, locate the Readme helper tool:
Project panel ▶︎ Assets folder ▶︎ Flat Kit folder ▶︎ select [Readme] and go to Inspector panel; - Press Clear Cache; You can clear the cache manually as well, just delete the Dustyroom folder from the following directory:
- Mac OS:
~/Library/Unity/Asset Store-5.x(press Shift+Cmd+G in Finder, paste this path, press Return); - Windows:
%APPDATA%\Unity\Asset Store-5.x(press Win+R, paste this path and press Enter); - Linux:
~/.local/share/unity3d/Asset Store-5.x;
- Mac OS:
- Delete the Flat Kit folder from the Project panel ▶︎ Assets folder;
- Got to Window ▶︎ Package Manager ▶︎ My Assets;
- Find Flat Kit among your assets, click Download, then Import.
- Please, locate the Readme helper tool:
- Verify that the Unity version is equal or is newer than 2020.3 LTS.
- If you are using the URP version of Flat Kit, please check if you have a Universal RP project open.
- Make sure that you are using a stable (not beta) verson of Unity.
- If nothing helps, please, contact us, we’ll be glad to help. Don’t forget to include the following:
- Info about the errors (a screenshot of Console panel, for example)
- Locate and select the [Readme] file (located by default in Assets folder ▶︎ Flat Kit folder), go to the Inspector panel, press Copy button in the Debug info section and paste the copied text in your mail (or just make a screenshot of the panel).
Comments